
As we head into winter, here’s a friendly reminder to check your plumbing to make sure it is ready for potentially freezing temperatures. Many fixtures may need attention to be winterized, including hose bibs, sprinkler systems, outdoor sinks, and more. In this post, we’ll take a look at winterizing hose bibs.
It’s a common misunderstanding that winterizing just means turning off the valves on the outside of a building. Water that is trapped inside a valve after shutting it off can still freeze, expand, and damage your plumbing.
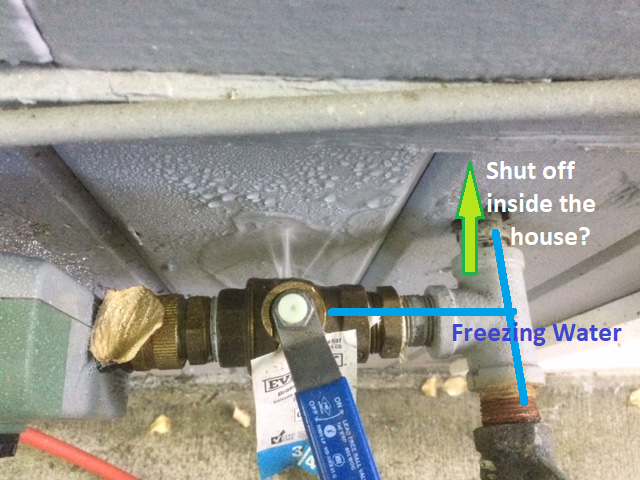
In this picture, we have an above-ground garden hose slow drip system with a timer. Water flows from inside the house (where the green arrow is pointing), through a tee (along the blue lines) and a shutoff valve (with the blue handle) to the timer (the gray and green box on the left). Because the outdoor piping wasn’t drained, when the water inside froze, it expanded and damaged the shutoff valve, causing this leak: the water is spraying out of the damaged valve body.
This shows how important it is to follow the right steps to winterize your outdoor piping:
- Turn the fixture off.
- Disconnect any hoses that are attached to the fixture.
- Turn off the isolation valve inside the building. If there is no shutoff or isolation valve inside the building, consider contacting a licensed plumber in your area to evaluate whether an isolation valve can be installed.
- Drain the fixture so that no water is trapped inside the fixture or any uninsulated piping between the isolation valve and the fixture.
- Cover or wrap the fixture and any exposed piping with foam, towels, or other insulating material.
Here are a couple of examples of hose bibs that can be winterized properly.


The first example (with the green handle) shows a modern frost free hose bib. This style of hose bib became common in the 1970s. The valve stem extends through the entire body of the hose bib. When properly installed, it shuts off the water in the interior of the building when it is closed. The body of the hose bib can then be drained out by disconnecting the hose from the bottom, so that no water is trapped inside the part of the hose bib that is outdoors or inside the uninsulated wall.
The second example (with the red handles) shows a proper installation for a regular hose bib, which can typically be seen in older construction. The hose bib (on the left, with the knob handle) is installed with an isolation valve (on the right, with a lever style handle) with a drain down valve in the interior of the building. To winterize this assembly, close the shutoff handle inside the building, then open and drain both the hose bib outside and the drain down valve on the isolation valve.
What to do in case of a hose bib leak caused by improper winterization
If you find a hose bib or other outdoor valve that is leaking, see if there is a way to shut off water going to the outdoor fixture from inside the building. If there is no shutoff or isolation valve, notify all occupants of the house, then find and close the main water shutoff for the building. Note that closing the main water shutoff may affect several other systems such as radiant heating, your water heater, showers, dishwasher, and more. If you need help finding or using your main water shutoff, contact a licensed plumber in your area. For larger than residential buildings, contact the property owner or property management to schedule a service call to repair or replace the fixture.